Posted by : ultah
April 24, 2014
Tag :// Tutorial Blog
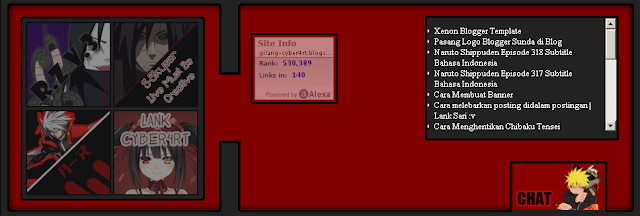
Hallo Semuanya :3 , Kali ini saya akan mengshare " Cara membuat box dibawah header "
oke Langsung Aja Ke TKP :
1 . Log In Blogger
2 . Pilih Blog Kamu
3 . Pergi Ke Template
4 . Klik Edit HTML
5 . Cari Kode ]]></b:skin>
6 . Masukan Kode Di Bawah Ini Tepat Di Atas Kode ]]></b:skin>
.dasar{
width:930px;
height:299px;
float: left;
border-radius: 5px 5px 5px 5px;
background: none repeat scroll 0% 0% rgb(128, 0, 0);
color: rgb(255, 255, 255);
border: 3px solid rgb(0, 0, 0);
padding: 5px;
margin-top: 20px;
margin-right: 10px;
margin-left: 10px;
box-shadow: 0px 0px 10px rgb(0, 0, 0) inset;
}

#dasar2{
width: 265px;
height: 258px;
float: left;
border: 3px solid black;
position: absolute;
margin-top: 37px;
margin-left: 29px;
padding:10px;padding-right:5px;
border-radius: 5px 5px 5px 5px;
background: #222;
}

#dasar2 img{
transition:All 1s ease;
-webkit-transition:All 1s ease;
-moz-transition:All 1s ease;
-o-transition:All 1s ease;border:2px solid #000;opacity:.5;
}

#dasar2 img:hover {
transition:All 1s ease;
-webkit-transition:All 1s ease;
-moz-transition:All 1s ease;
-o-transition:All 1s ease;border:2px solid #800; opacity:1.0}

#dasar3 {
width:550px;
height:262px;
background:#222;
float:right;
border:3px solid #000;
position:absolute;
margin-top:40px;
margin-left: 372px;
padding:5px;
border-radius:5px;
-moz-box-shadow:inset 0 0 10px #000000;
-webkit-box-shadow:inset 0 0 10px #000000;
box-shadow:inset 0 0 10px #000000;}

#widgetbanneralexa{
float: left;
margin-left: 378px;
width: 120px;
height: 95px;
border: 3px solid #000000;
margin-top: -270px;
padding: 3px;}

#widgetbanneralexa img{opacity:0.5;-webkit-filter:saturate(0.0);-moz-filter:saturate(0.0);-ms-filter:saturate(0.0);-o-filter:saturate(0.0);filter:saturate(0.0);-webkit-transition:all 1s ease-in-out;-moz-transition:all 1s ease-in-out;-ms-transition:all 1s ease-in-out;-o-transition:all 1s ease-in-out;transition:all 1s ease-in-out;padding:0}
#widgetbanneralexa img:hover{opacity:1;-webkit-filter:saturate(1.1);-moz-filter:saturate(1.1);-ms-filter:saturate(1.1);-o-filter:saturate(1.1);filter:saturate(1.1);-webkit-transition:all .1s ease-in-out;-moz-transition:all .1s ease-in-out;-ms-transition:all .1s ease-in-out;-o-transition:all .1s ease-in-out;transition:all .1s ease-in-out}

.Kotak2 {
background: #222;
border:4px solid #000000;
border-top:4px solid #212121;
height:100px;
width:25px;
float:left;
margin-top: -315px;
margin-left: 330px;
}

.Kotak3 {
background: #222;
border:4px solid #000000;
border-bottom:4px solid #212121;
height:100px;
width:25px;
float:left;
margin-top: -106px;
margin-left: 330px;
}


#headlines{
float: left;
margin-left: 642px;
width: 285px;
height: 180px;
border: 3px solid black;
background: #222;
margin-top: -294px;
padding: 1px;}

#LankChat   {
background: #800;
border: 4px solid #000;
border-bottom: 4px solid #212121;
width: 140px;
height: 70px;
-webkit-transition:All .9128s ease;-moz-transition:All .9128s ease;-o-transition:All .9128s ease
float: left;
margin-top: 257px;
position: absolute;
margin-left: 770px;
color:#c2c2c2;line-height:1.5em;text-align:center;
position: absolute;
}

#LankChat:hover {
margin-left: 680px;border-radius: 13px 13px 0 0;border-left:4px solid #000;border-right:4px solid #000;border-top:4px solid #000
-webkit-transition:All .9128s ease;-moz-transition:All .9128s ease;-o-transition:All .9128s ease
}
7 . Oke Lanjutkan Dengan HTML nya
8 . Sekarang Cari Kode <div id='content-wrapper'> Atau <div id='content'> Pokoknya yang berhubungan Dengan Content
9 . Pasang Kode Di Bawah Ini Tepat Di Atas ( <div id='content-wrapper'>
atau <div id='content'> Sejenisnya )
<div class='dasar'/>
<b:section id='dasar2' maxwidgets='5' showaddelement='yes'>
</b:section>
<b:section id='widgetbanneralexa' maxwidgets='5' showaddelement='yes'>
</b:section>
<div class='Kotak2'>
</div>
<div class='Kotak3'>
</div>
<b:section id='headlines' maxwidgets='5' showaddelement='yes'>
</b:section>
<div id='LankChat'>
<a href='http://lankchat.blogspot.com/'
target='_blank' title='LankChat Box'><img
alt='LankChat Box '
src='http://i1061.photobucket.com/albums/t479/Gilang28k/sayonara2_zpsc0422daa.png'/></a>
</div>
Selesai dehh :v , tinggal edit2 sendiri
{ 5 komentar... read them below or Comment }
Untuk menyisipkan kode, gunakan tag <i rel="code">KODE ANDA DI SINI...</i> atau <i rel="pre">KODE ANDA DI SINI...</i>
Untuk menyisipkan gambar, gunakan tag <i rel="image">URL GAMBAR ANDA DI SINI...</i>
Untuk menyisipkan judul, gunakan tag <b rel="h3">JUDUL ANDA DI SINI...</b>
Untuk menyisipkan catatan, gunakan tag <b rel="quote">CATATAN ANDA DI SINI...</b>
Untuk menciptakan efek tebal gunakan tag <b>TEKS ANDA DI SINI...</b>
Untuk menciptakan efek huruf miring gunakan tag <i>TEKS ANDA DI SINI...</i>

keren gan tutorialnya jadi bisa nambah space buat iklan hehehe :D
ReplyDeleteHehe iya :v
Deletemastah berbagi, mau pertamak ga jadi :D
ReplyDeleteinformasi yang sangat bermanfaat, trimakasih :)
kunjungan balik http://vzrblog.tk
oke
DeleteThanks ya gan atas tutorialnya. Nice post
ReplyDeleteKunjungan dari http://kang-pp.blogspot.com/